Last week, we published the first instalment in our Loaves in the Time of Cholera series, highlighting the favourite bread recipes of members of the McGill community. Today, we present the second and final batch, fresh out of the oven. Enjoy!
_______________
For Oliver de Volpi, the COVID-19 pandemic presents people with the opportunity to indulge in one of his all-time favourite activities – cooking. Of course, as McGill’s Executive Chef, de Volpi might be a tad biased.
“Cooking and creating are natural instincts and under other circumstances we might be gardening or home building, but this was just a perfect storm,” he says. “Everybody cooks a little (some of us are already passionate about it) but baking is a treat. Making dessert or bread is an indulgence that, at this time, we can’t pass up.
“Chocolate cake, warm cookies from the oven, fresh baked breads and loaves are all a calming and comforting foods,” says de Volpi. “If you’ve never done it, it definitely the time to try it at least once – or to up your game.”
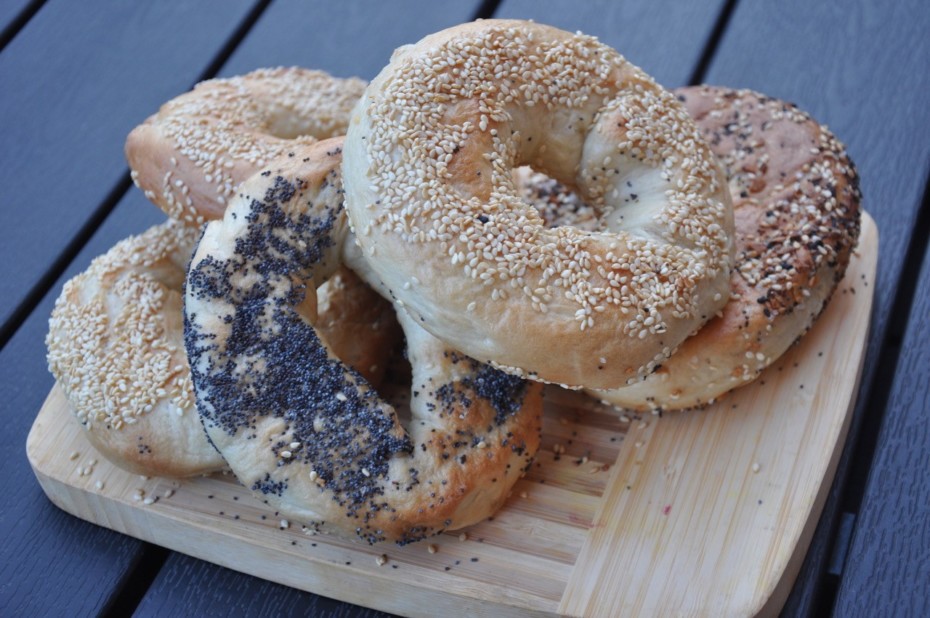
Hearing about our call for bread recipes, de Volpi submitted his recipe for bagels
Ingredients:
- 5 cups of warm water (30-40C)
- 3 tbs honey
- 1 tbs vegetable oil
- 8g dry yeast (1 package)
- 1 tsp salt
- 5 cups of all-purpose flour
For finishing:
- 6-8 litres pot + 1 cup honey (can be replaced by a mixture of sugar and honey)
- Sesame seeds
- Poppy seeds
Preparation:
- Mix yeast together with water and honey and let stand 5 minutes.
- In a large bowl or a stand mixer with the dough hook attachment, mix together water yeast mixture, oil and flour until a soft dough forms.
- Turn dough out onto surface and gently knead until it begins to comes together. Continue to knead, adding small amounts of flour if needed to prevent sticking, until you have a soft, dough that bounces back when you press on it – 10–12 minutes.
- When dough is properly kneaded, leave on table and cover with a large mixing bowl and let rest 30 minutes.
- Cut dough into 12 pieces (about 80g each).
- Preheat oven to 450° F with a parchment paper-lined baking sheet inside.
- Fill a large pot with water. Put to boil over medium-high heat.
- Shaping: Roll each piece into a 10-inch ropes. Do not add flour to the surface, unless to prevent sticking.
- Wrap rope around your four fingers, overlapping the ends on the inside of your hand to make a circle. To seal, roll your hand back and forth, pressing gently to complete the circle. Place the shaped bagels on a cookie sheet lined with parchment paper, cover with a moist bowl and let rest 10-15 minutes.
- Add honey to pot of water and bring to a full boil.
- Handle rested bagels gently to keep their shape. Boil bagels in batches, 1 minute per side. Remove from water using a slotted spoon. Place back onto cookie sheet and sprinkle heavily with seeds.
- Cook bagels 8 minutes per side and until golden brown, 15-20 minutes total.
_______________
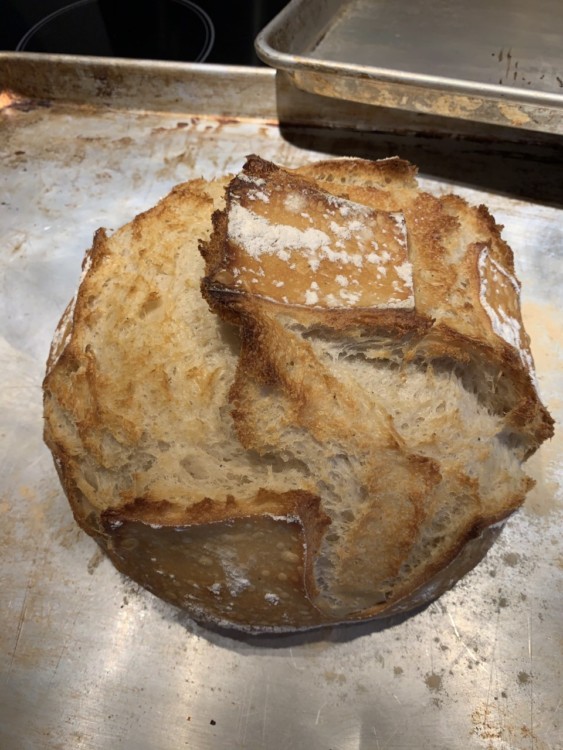
Oliver de Volpi is not the only cook in the family. Kayla de Volpi, Oliver’s daughter, also knows her way around the kitchen. Kayla, who will start at McGill in psychology this fall, has supplied us with a recipe for “a simple no-knead bread that you prepare overnight.”
Ingredients
- 3 cups of all-purpose flour
- 1-1/4 tsp of active dry yeast
- 2 big tsp of Salt
- 1 tsp of Sugar
- 1-1/2 cups of water that has been warmed up to about 115 degrees
Preparation
-

Kayla de Volpi’s No-Knead Bread In a small bowl, mix together the yeast with the sugar and warm water, set aside until the yeast is foamy and activated, about 4 minutes.
- In a large bowl, add the remaining ingredients including the water and yeast mixture, and using a wooden spoon mix everything to mix (you will have to finish by hand because it gets a little hard to mix near the end with the wooden spoon) until the flour is incorporated with the water.
- Cover the bowl with some plastic wrap and leave it somewhere undisturbed for about 8 hours or overnight.
- Preheat your oven to 450 degrees, place a Dutch oven in the oven to preheat it as well.
- After 8 hours, scrape the dough (which will be very thin and sticky) on a floured surface and just pull it together into a loose ball, add it to the hot Dutch oven, put the lid on and pop it in the oven for 30 minutes, after 30 minutes remove the lid and bake for an additional 15 minutes.
- **other option is too pre-heat the oven at 450 degrees. Put a baking tray at the bottom of the oven to preheat. Place the bread on a floured baking tray (different from the one preheating in the oven) and place the dough on the tray.
- Sprinkle a little flour on top of the dough. Add around two cups of warm water to the preheated baking tray that is at the bottom of the oven. Place the dough in the oven for 30 minutes.
Watch a full video or find more quarantine recipes @cooking_withkayla on Instagram
_______________
Another McGill student, Haruka Yoshida (U2 Nursing), sent us her favourite recipe for buns.

Ingredients
- Whole wheat bread flour 200g
- All purpose flour 100g
- Warm water 160g
- Sugar or honey 2 tbsp
- Salt 1/2 tsp
- Active dry yeast 1/2 tsp
- Soften Butter salted or unsalted 25g
Preparation
- Combine all dry ingredients, add water = mix until even mixture
- Add the softened butter and knead
- Make 1 smooth ball with the dough and place in an oiled bowl
- Cover with wrap or moist cloth and let it rise for 1h
- Punch the dough (let air out) and divide into 8 equal pieces = shape into small bowl
- Place them on a pan (spaced) and let it rise for another 1h
- “Coupe” = put a diagonal cut on the top of the bun and flour them
- Bake for 20 minutes in a 200ºC oven
“Enjoy with butter or make sandwiches,” she says. “They are really healthy and delicious!”
_______________

Michelle Cubano-Guzmán, Faculty Relocation Advisor, Academic Personnel Office, Office of the Provost and Vice-Principal (Academic), sent us a picture of her husband Victor Muñiz-Fraticelli, a professor at the Faculty of Law and the Faculty of Arts, and 14-year-old son Ignacio enjoying the fruits (or, in this case, cinnamon bread) of their labour.
Ingredients
- 3 cups (361g) King Arthur Unbleached All-Purpose Flour or King Arthur Pastry Flour Blend
- 1/2 cup (99g) sugar
- 2 teaspoons instant yeast or active dry yeast
- 1 teaspoon cinnamon
- 1 teaspoon salt
- 1 teaspoon baking powder
- 1 cup (227g) warm milk
- 4 tablespoons (57g) unsalted butter, melted
- 1 large egg
- 1 cup (142g) cinnamon sweet bits or cinnamon chips
- cinnamon-sugar, for topping
Instructions
- In a large bowl, whisk together the flour, sugar, yeast, cinnamon, salt, and baking powder. Make a well in the center and pour in the milk, melted butter, and egg. Mix until combined, then beat until smooth. Stir in the cinnamon sweet bits.
- Cover and let the batter rest for 1 hour at room temperature. Toward the end of the rising time, preheat the oven to 350°F.
- Grease an 8 1/2″ x 4 1/2″ loaf pan. Transfer the batter to the pan and generously sprinkle the top with cinnamon sugar.
- Bake for 45 to 50 minutes, until a paring knife inserted into the centre comes out clean. Remove from the oven and place the pan on a rack for 5 to 10 minutes.
- Turn the bread out of the pan and return to the rack to finish cooling completely before slicing.
- Store wrapped at room temperature for up to three days; freeze for longer storage.
The recipe can be found online
_______________
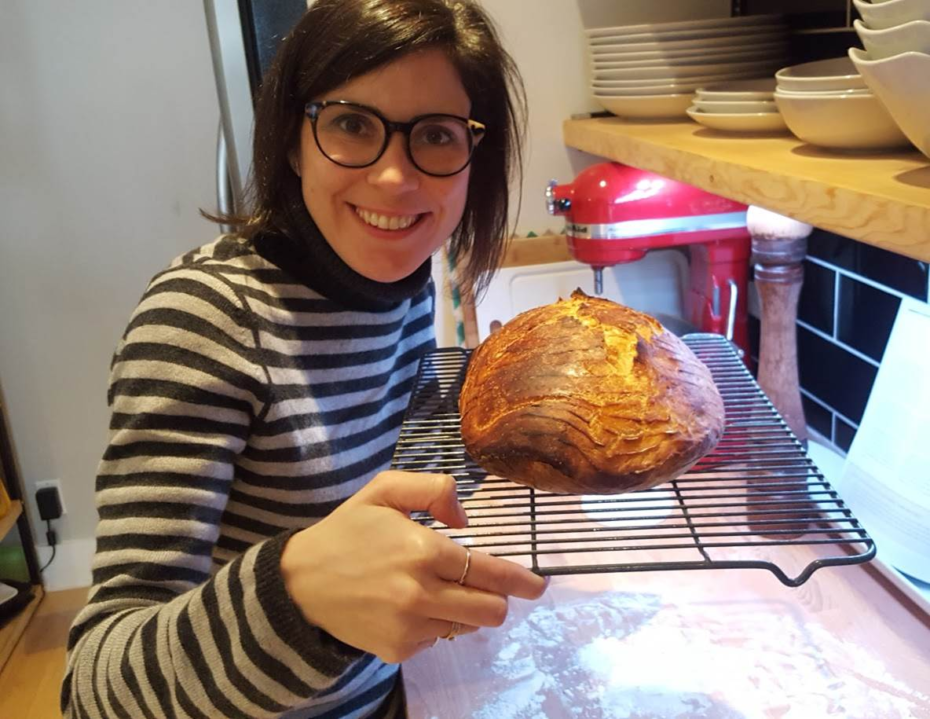
Elise Boivin-Ford, Project Coordinator, Department of Pharmacology and Therapeutics, submitted a recipe for earl Grey tea cakes. “It is not called bread, but it is… and it is delicious,” she writes.
Ingredients
- 200g mixed dried fruit, any larger pieces chopped (we used raisins, sultanas, dried cherries and apricots)
- zest ½ orange
- 200ml hot Earl Grey tea, made from 2 tea bags
- 250ml whole milk 75g butter, cubed, plus extra to serve
- 500g strong white bread flour, plus extra for dusting
- 1½ tsp mixed spice
- 50g caster sugar
- 7g sachet fast-action dried yeast
- 1 large egg, beaten
- apricot jam, to glaze
Preparation
- Put the fruit and zest in a bowl and cover with the hot tea. Leave to steep overnight.
- Heat the milk in a small pan until hot but not boiling. Remove from the heat and add the butter, swirling the pan to help the butter melt and cool the milk. Leave to cool to hand temperature. Tip the flour, mixed spice, sugar, yeast and ½ tsp salt into a large bowl. Pour in the warm milk mixture, the egg and 1 tbsp of the tea from the soaked fruit. Mix with a wooden spoon to combine, then tip onto your surface and knead for 5 mins until smooth and elastic, adding a little more flour if the mixture is too sticky. Place in a clean, oiled bowl and cover with cling film, then leave in a warm place to rise for 2 hrs until doubled in size.
- Flour 2 large flat baking trays, knock all the air out of your dough and add the soaked fruit (drain the fruit first if you have any liquid left in the bowl). Knead the fruit into the dough until well distributed – you may need to add a little extra flour if the fruit makes the dough too sticky. Break into 6 pieces and shape into balls. Place on the floured baking trays, well spaced apart, and squash each down lightly with the palm of your hand. Cover loosely with oiled cling film, then leave to prove for 30 mins-1 hr, until doubled in size
- Heat oven to 200C/180C fan/gas 6. Uncover the teacakes and bake for 25 mins, swapping the trays over halfway hrough cooking, until golden and hollow-sounding when tapped on the base. Brush each one with a little apricot jam and return to the oven for a further 1-2 mins. Leave to cool on a wire rack. Serve warm from the oven or split and toasted, topped with lashings of butter. Will keep in a tin for up to 4 days.
_______________
“I love this request,” writes Sara Charbonneau, Health and Well-Being Advisor, Benefits, Human Resources. “McGill bread community unites!”
“I have been making sourdough for a few years now,” says Charbonneau, who is also a regular contributor to our McGill Reads series, “and it is so nice to see so many people experimenting with it and baking so much bread!”
Charbonneau sent us a link to a recipe for artisan sourdough rye bread.
Ingredients
- Water: 400 grams, 1 3/4 cups
- Sourdough Starter: 70 grams, 1/3 cup (omit if making the instant yeast version)
- Instant Yeast: 1 tsp. (omit if making sourdough leavened version)
- Rye Flour: 245 grams, 1 3/4 cups
- Bread Flour: 245 grams, 1 3/4 cups
- Molasses: 44 grams, 2 Tbs.
- Fennel Seed: 8 grams, 1 Tbs.
- Anise Seed: 2 grams, 1 tsp.
- Caraway Seed: 3 grams, 1 tsp.
- Salt: 12 grams, 1 3/4 tsp.
- Zest of 1 Orange
Instructions
Sourdough version:
- In a mixing bowl, mix the starter into the water. Add the molasses, all the seeds and orange zest.
- In a separate bowl, combine the flours and salt.
- Gradually stir the dry ingredients into the wet using a dough whisk or spoon until the flour is well incorporated. Cover with plastic and let rest for 15 minutes. After about 15 minutes, mix again for a minute or two. Again let rest for 15 minutes and mix one more time as before. Now cover the bowl with plastic and let sit at room temperature for roughly 12-14 hours.
Instant yeast version:
- The only difference is don’t use sourdough starter and instead mix the instant yeast into the dry ingredients before combining with the wet ingredients.
Both versions
- After the long 12-14 hour proof, stretch and fold the dough and shape into boule or batard (round or oblong) shape for baking. (If you didn’t follow that, I’m afraid you’re doomed to watch the video.) Cover again with plastic and let rest 15 minutes before putting in a proofing basket for the final rise. If you don’t have a proofing basket, line a bowl with a well-floured kitchen towel and put the dough in there for the final rise. The final rise should last somewhere between 1 to 1 1/2 hours. Keep the dough covered with plastic to prevent it from drying out.
- Preheat your oven to 475 F a half hour before baking.
- Score the dough with a razor or sharp serrated knife and bake until the internal temp is about 200 F.
- Let cool completely before eating.
Notes
On 12-14 hour proofing period: I typically prepare everything in the evening for baking the next morning. You can also mix everything up in the morning and refrigerate until evening then remove before bed to resume the proofing at room temperature. Alternatively, if you get started with mixing everything up early enough in the morning, the bread can also be ready to bake in the evening. This is a nice option when you want fresh bread ready to eat for breakfast.
_______________
The final recipe in the series comes from Rosie Goldstein, a professor in the Faculty of Medicine and former VP, Research and Innovation.
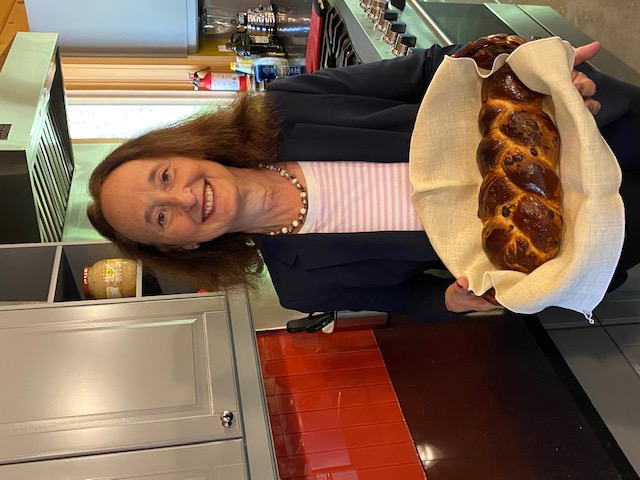
“I have enjoyed reading your writing about bread and have been experimenting myself,” writes Goldstein. “This is an easy recipe for challah, which has several variations. I follow the recipe in the classic Jewish Montreal cookbook, Second Helpings, Please, written by Norene Gillette, who has been called the ‘Julia Child of Jewish Canadian Cooking.’ She recently passed away, and her cookbooks are still bestsellers. Like many young Jewish women in Montreal at the time, I was given this cookbook by my mother over 40 years ago.”
Ingredients
- 1 tsp. sugar
- 1/2 cup warm water
- 1 pkg. yeast
- 1/2 cup oil
- 1/2 cup warm water
- 1/4 cup sugar
- 2 tsp. salt
- 2 eggs
- 3 1/2 – 4 cups all purpose flour
- Poppy and/or sesame seeds
- 1 egg yolk beaten with 1 tsp. water
Preparation
Dissolve sugar in 1/2 cup warm water in large mixing bowl which has first been rinsed with hot water. Sprinkle yeast on top and let stand for 10 minutes. Stir to dissolve. combine with oil, water, sugar, salt, eggs and half of the flour. Beat well. Stir in remaining flour. Dough should be sticky. Cover dough and let rest for 10 minutes. turn out onto a floured board and knead for 10 minutes, adding flour as needed. Round up in a greased bowl. Cover and let rise in a warm place until double in bulk, about 1 1/2 – 2 hours. Punch down, cover and let rise again until double, about 45 minutes. Divide dough into 3 equal parts. Shape into long strands. Place on a lightly greased baking sheet and braid loosely. Fasten ends securely, using dab of water to help make the seal, if necessary. Cover with a damp cloth and let rise until doubled in size. Brush top and sides with beaten egg yolk and sprinkle generously with seeds. Bake at 400 degrees for 30 minutes, until golden brown.
“I varied the recipe by adding 2/3 cup raisins to the dough just before kneading,” says Goldstein. “You can also divide up the dough and make up to 12 small challah buns.”